Originally, the framers were not available until the end of November. But then a cancelled job pulled our estimated start date up to the beginning of November. Alas, subsequent delays moved it back to the middle of the month and then back to the end of November. Ultimately, framing began December 9. The positive aspect of these delays is that we were able to get the septic system installed and tested in November.
![]() We
were lucky that the soil on the 100-foot strip we added to our lot on the west
side perked much better than the rest of the lot. We were able to put in a normal
pressure system (pressure because the septic field is higher than the house
and we need to pump water from the septic tank below the house up to the field)
instead of the more complicated and expensive sand filter system that was needed
for the original lot. But since this was new uncleared land, the first step
was to clear the area where the septic field would go. The resulting logs were
donated to Hearts & Hammers (similar to Habitat for Humanity) and the rest
was put in the big burn pile seen here.
We
were lucky that the soil on the 100-foot strip we added to our lot on the west
side perked much better than the rest of the lot. We were able to put in a normal
pressure system (pressure because the septic field is higher than the house
and we need to pump water from the septic tank below the house up to the field)
instead of the more complicated and expensive sand filter system that was needed
for the original lot. But since this was new uncleared land, the first step
was to clear the area where the septic field would go. The resulting logs were
donated to Hearts & Hammers (similar to Habitat for Humanity) and the rest
was put in the big burn pile seen here.
 The
septic tank was installed below the house to allow gravity feed from the house.
It consists of a 1000 gallon tank plus a 1000 gallon pump chamber and will be
buried except for the three access silos with the green tops. The first two
provide access to the entry and exit pipes to and from the main tank. The third
provides access to the pump chamber.
The
septic tank was installed below the house to allow gravity feed from the house.
It consists of a 1000 gallon tank plus a 1000 gallon pump chamber and will be
buried except for the three access silos with the green tops. The first two
provide access to the entry and exit pipes to and from the main tank. The third
provides access to the pump chamber.
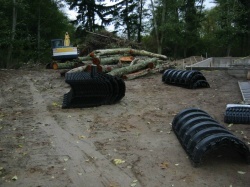 The
water from the septic tank is pumped to the septic field where it flows through
tiles buried in the ground that allow it to seep into the soil. Traditionally,
"tiles" consisted of pipes with holes in them. The black tiles that
are shown here are a newer version designed to enhance the flow of water and
its dispersion into the soil. The tiles were installed in just two days and
the system was in and tested by November 8th.
The
water from the septic tank is pumped to the septic field where it flows through
tiles buried in the ground that allow it to seep into the soil. Traditionally,
"tiles" consisted of pipes with holes in them. The black tiles that
are shown here are a newer version designed to enhance the flow of water and
its dispersion into the soil. The tiles were installed in just two days and
the system was in and tested by November 8th.
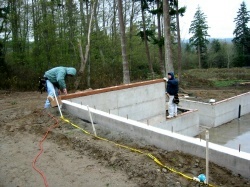 One
month later, work resumed when the framing crew became available. The first
step was to lay out the baseplates and secure them with the bolts that had been
set in the concrete walls. This consisted of cutting the baseplates to length,
drilling the holes to fit them over the bolts, and fastening them down with
nuts on the bolts.
One
month later, work resumed when the framing crew became available. The first
step was to lay out the baseplates and secure them with the bolts that had been
set in the concrete walls. This consisted of cutting the baseplates to length,
drilling the holes to fit them over the bolts, and fastening them down with
nuts on the bolts.
 The
actual framing began with the stepped down basement wall seen here. The doorway
in the center with the concrete steps beyond is the workshop exterior door.
The
actual framing began with the stepped down basement wall seen here. The doorway
in the center with the concrete steps beyond is the workshop exterior door.
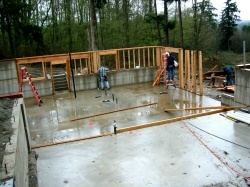
 Here
the framing of the exterior basement walls has been completed. Note the framing
along the inside of the concrete walls. These are used primarily to hold the
insulation needed in the basement. In addition to the external walls, the base
plates for the interior walls have been bolted in place. You can now see the
rooms. The room in the far corner is the workshop. To its left is the storage
room. The small room in the middle with the pipes coming out of the floor is,
of course, the bathroom.
Here
the framing of the exterior basement walls has been completed. Note the framing
along the inside of the concrete walls. These are used primarily to hold the
insulation needed in the basement. In addition to the external walls, the base
plates for the interior walls have been bolted in place. You can now see the
rooms. The room in the far corner is the workshop. To its left is the storage
room. The small room in the middle with the pipes coming out of the floor is,
of course, the bathroom.
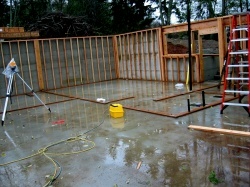
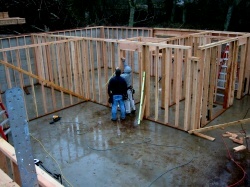 One
day later from the same angle, the interior walls are up and the aforementioned
rooms are now obvious. The door where the framers are working is the door leading
to the little hall by the workshop and bathroom. It's difficult to see, but
it you look closely at the wall on the extreme right, you will notice a number
of 2x4's missing, i.e., a hole in the bathroom wall. That's intentional since
the tub/shower combo is not yet here and it won't fit through the door.
One
day later from the same angle, the interior walls are up and the aforementioned
rooms are now obvious. The door where the framers are working is the door leading
to the little hall by the workshop and bathroom. It's difficult to see, but
it you look closely at the wall on the extreme right, you will notice a number
of 2x4's missing, i.e., a hole in the bathroom wall. That's intentional since
the tub/shower combo is not yet here and it won't fit through the door.
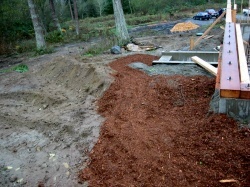 As
you probably noticed, the concrete slabs are wet in all the pictures. This is
after all December in Seattle. All the rain created slippery mud making it difficult
for the framers to move around. Ralph solved the problem by spreading bark chips
around the site to provide more stable walkways. There were two dump trucks
full of chips. This was my first assignment. Ralph and I spent 3 hours spreading
chips from two dump truck loads around the site. Do I need to mention that we
did this in the rain.
As
you probably noticed, the concrete slabs are wet in all the pictures. This is
after all December in Seattle. All the rain created slippery mud making it difficult
for the framers to move around. Ralph solved the problem by spreading bark chips
around the site to provide more stable walkways. There were two dump trucks
full of chips. This was my first assignment. Ralph and I spent 3 hours spreading
chips from two dump truck loads around the site. Do I need to mention that we
did this in the rain.
That brings us up to date which is in fact Friday, December 13, 2002.