Building a House on Whidbey Island
Excavation and Foundation Work
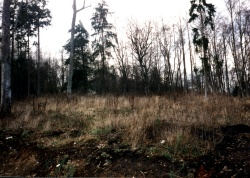 The
lot slopes downhill from west to east. This is a view from the cul-de-sac at
the southeast corner of the lot looking up the hill. This is actually a picture
from 1995. The trees are much bigger now and there are a lot more of them as
well as miscellaneous brush. The douglas fir on the right side of the picture
is the only real tree we had to sacrifice. It's in the middle of the living
room.
The
lot slopes downhill from west to east. This is a view from the cul-de-sac at
the southeast corner of the lot looking up the hill. This is actually a picture
from 1995. The trees are much bigger now and there are a lot more of them as
well as miscellaneous brush. The douglas fir on the right side of the picture
is the only real tree we had to sacrifice. It's in the middle of the living
room.
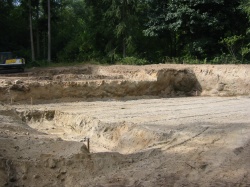 The
house site was excavated by 9/14. The basement extends only under the main part
of the house, i.e. below the living room, dining room, bedrooms, and baths.
In the photo, the lowest level is the excavation for the basement. Where the
dirt rises on the left is the crawl space under the kitchen and laundry room.
The slight rise above that is to the garage floor.
The
house site was excavated by 9/14. The basement extends only under the main part
of the house, i.e. below the living room, dining room, bedrooms, and baths.
In the photo, the lowest level is the excavation for the basement. Where the
dirt rises on the left is the crawl space under the kitchen and laundry room.
The slight rise above that is to the garage floor.
 By
9/19, the forms needed to pour the concrete footings were set. The photo shows
the footing layout along the wall between the house and the garage. The garage
is to the left and extends to the center of the photo in the foreground. The
section behind that garage extension is under what will become the laundry room.
By
9/19, the forms needed to pour the concrete footings were set. The photo shows
the footing layout along the wall between the house and the garage. The garage
is to the left and extends to the center of the photo in the foreground. The
section behind that garage extension is under what will become the laundry room.
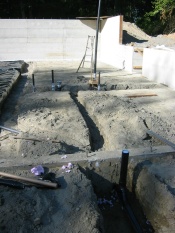
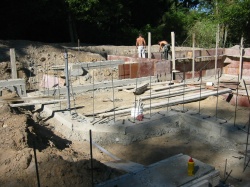 The
concrete footings were poured on 9/20. As they were poured, the vertical reenforcement
bars were installed as shown in this photo. Once dried, the footing forms were
removed and the crew began installing the forms needed to pour the concrete
walls. The s-shaped footing is the one made from the forms in the middle of
the photo above, i.e. the wall between the house and garage, but from a different
angle.
The
concrete footings were poured on 9/20. As they were poured, the vertical reenforcement
bars were installed as shown in this photo. Once dried, the footing forms were
removed and the crew began installing the forms needed to pour the concrete
walls. The s-shaped footing is the one made from the forms in the middle of
the photo above, i.e. the wall between the house and garage, but from a different
angle.
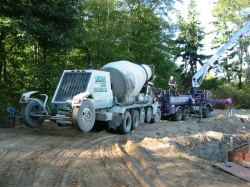
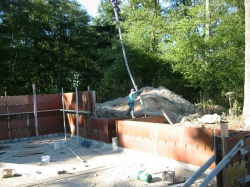 The
walls were poured on 9/26. That meant getting concrete trucks and a concrete
pumping machine up the tiny road to our lot and guiding the pumped concrete
through the hose into the forms.
The
walls were poured on 9/26. That meant getting concrete trucks and a concrete
pumping machine up the tiny road to our lot and guiding the pumped concrete
through the hose into the forms.
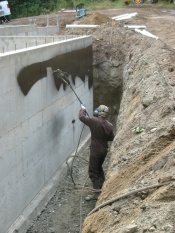 The
forms were removed from the walls on 9/30. The walls were smoothed and and then
waterproofed as shown in the photo. Insulation styroform two inches thick was
installed over the waterproofing. Ralph then laid out a drainage system around
the foundation designed to take away any standing water that could eventually
seep into the basement. Then the hole shown was backfilled with sand. The sand
is used to allow any water to easily penetrate to the drainage system and be
carried away from the house.
The
forms were removed from the walls on 9/30. The walls were smoothed and and then
waterproofed as shown in the photo. Insulation styroform two inches thick was
installed over the waterproofing. Ralph then laid out a drainage system around
the foundation designed to take away any standing water that could eventually
seep into the basement. Then the hole shown was backfilled with sand. The sand
is used to allow any water to easily penetrate to the drainage system and be
carried away from the house.
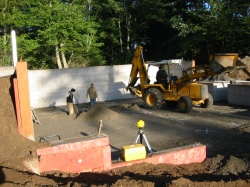 Once
all the concrete walls were backfilled, attention turned to the slabs for the
basement and garage. The first step was to put in 8 inches of sand and tamp
it solidly down. That's already been done in the photo. Next the sand is prepared
for the interior support wall footings. Instead of setting forms, this is done
by digging trenches in the sand at the appropriate places. When the slab is
poured, the trenches will be filled in providing a one foot footing (concrete
in the eight inches of trench plus the 4 inch slab). The photo shows the trenches
being dug.
Once
all the concrete walls were backfilled, attention turned to the slabs for the
basement and garage. The first step was to put in 8 inches of sand and tamp
it solidly down. That's already been done in the photo. Next the sand is prepared
for the interior support wall footings. Instead of setting forms, this is done
by digging trenches in the sand at the appropriate places. When the slab is
poured, the trenches will be filled in providing a one foot footing (concrete
in the eight inches of trench plus the 4 inch slab). The photo shows the trenches
being dug.
In addition to the trenches for the footings, all
the gravity drain pipes, i.e. sewer lines, need to be installed before the slab
is poured. The two pipes to the left in the middle set are for the basement
bath (one is the drain, the other a vent). The ones to the right of those will
be extended upward to handle the bathrooms on the main floor. Finally, the diagonal
pipe going off to the left just beyond the front footing is for the kitchen
drain.
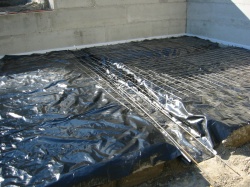
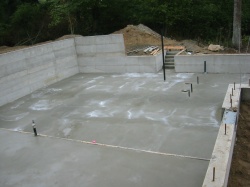 Next
a plastic vapor barrier is layed down as shown on the left. The iron bars are
to reenforce the footings. The iron grid is used to reenforce the slabs. Finally
the slab was poured along with the concrete stairs to the workshop (see photo
on right).
Next
a plastic vapor barrier is layed down as shown on the left. The iron bars are
to reenforce the footings. The iron grid is used to reenforce the slabs. Finally
the slab was poured along with the concrete stairs to the workshop (see photo
on right).
The next step will be the framing to begin about
mid-November when the framing crew becomes available. In the mean time, work
is proceeding on the septic system. As noted in the background material, we
originally committed to a sand filter system since we didn't own the area that
perked well enough for a traditional septic system. By the time we found Ralph,
we had closed the deal on the additional 100 feet which would be enough for
a septic system. On 9/14, perk holes were dug and a couple were found to be
reasonably good. An engineer concurred on 9/18 and the county approved the location
on 9/20. A new design was drawn up by the engineer and a new permit was submitted
to the county on 9/25. It has recently been approved and clearing the area for
the new septic design began the week of 10/21.
That brings us up to date which is in fact October
24, 2002.